Princess Girl Dress Change Ai Video Editing Prompts – The “Princess” trend is currently going viral on social media—you’ve likely already seen it. If you have, you’ll know that this trend is being created specifically for girls; in this article, I’m going to show you exactly how to perform this type of editing. If you’re interested, you can easily create these edits for anyone at home. I will walk you through the entire process—explaining exactly what tools you’ll need and how to create these videos—starting with the photo-editing phase and then converting it into a video. This tutorial covers the editing process in absolute detail, so read this article carefully; by the time you reach the end, your edit will be ready and looking completely professional.
What Exactly Makes This Particular Video Trend?
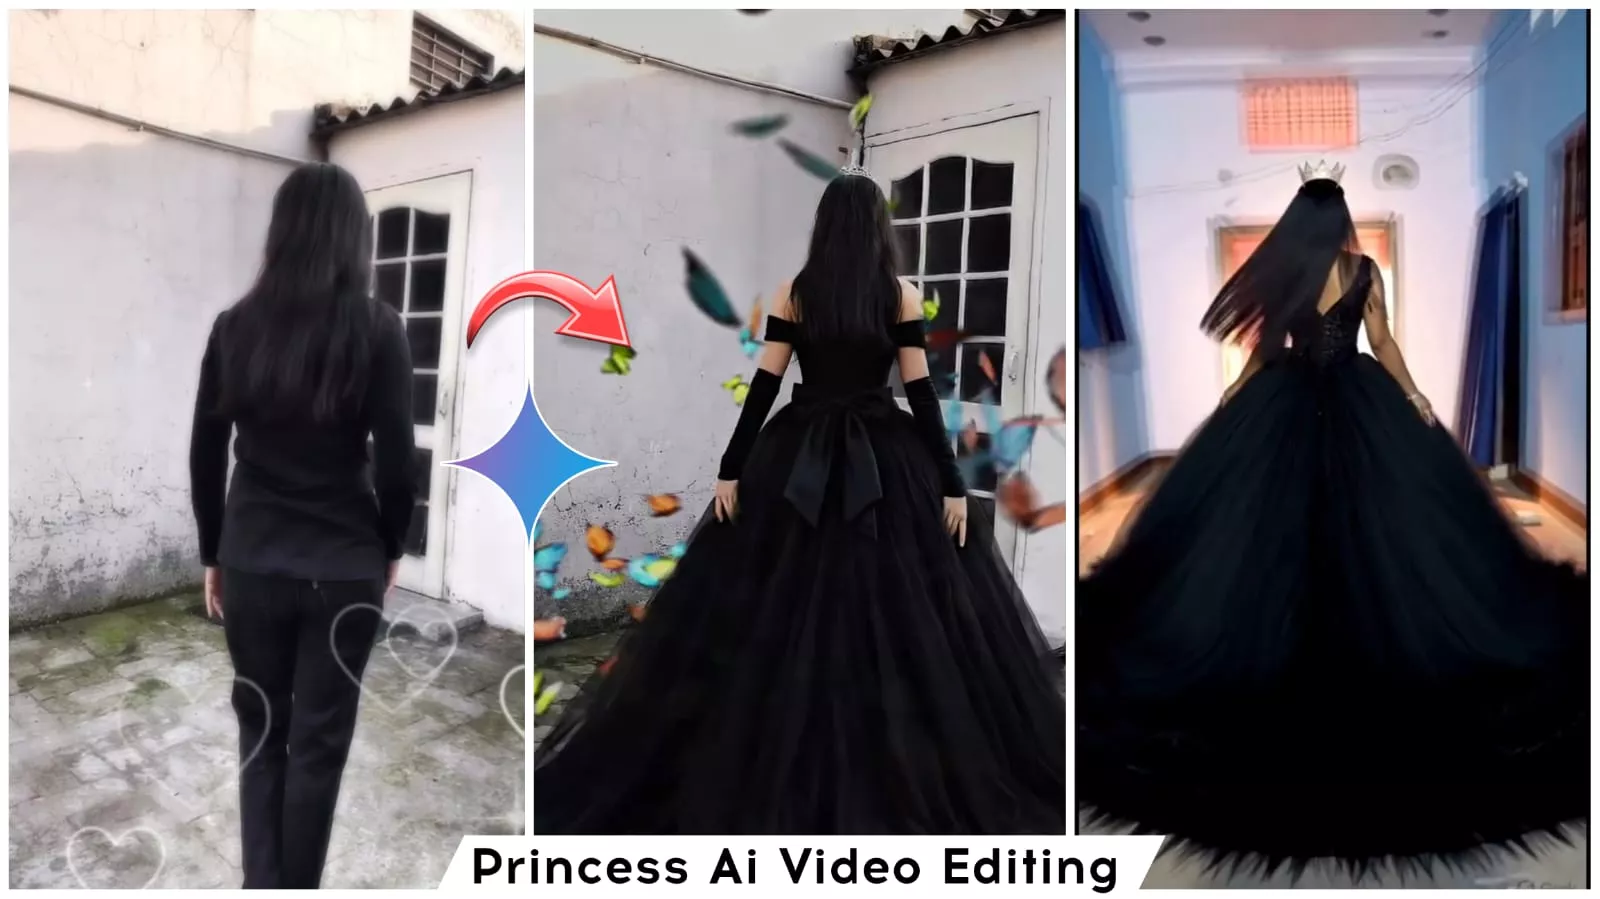
Let me explain. First and foremost, the editing involved here is AI-based; it allows you to transform a standard video clip of yourself into a “Princess” style video. In the converted footage, you will see yourself adorned in a princess dress—perhaps a royal gown or even a crown—while your surroundings, whether it be your home or any other area, are completely transformed into a magnificent royal palace. You will witness magical lighting effects, fluttering butterflies, and an overall fairy-tale-style atmosphere. In essence, the entire video evokes the distinct feel of a Disney Princess movie.
Details Of Princess Girl Dress Change Ai Video Editing Prompts
Why is the “Princess AI” video editing trend gaining so much traction? Many of you have been asking this very question. The reason is that this particular editing style—being tailored specifically for girls—has sparked immense interest among them. Furthermore, everyone seems to absolutely love this kind of fantasy theme, particularly the “Princess” videos. When a video is transformed using this style, it evokes a truly magical and regal atmosphere, creating a distinct and unique vibe. It has become a major trend on social media, with numerous videos going viral and inspiring even more people to create their own versions. The process itself is quite easy; users can effortlessly apply the edits, resulting in content that garners significant popularity. Ultimately, it offers viewers the chance to enjoy stunningly beautiful visuals—something that would typically be quite difficult to achieve through standard editing methods—making the final result incredibly captivating.
Editing Process Of This Editing
Now, let’s understand how we actually go about creating this type of video. First, you need to record a video of yourself walking—specifically, one filmed from behind you as you walk forward. You should record a clip that is approximately 5 seconds long. Next, you must take a screenshot of the very last frame of that video clip; be sure not to capture a frame from anywhere else. If you take a screenshot from the middle of the clip, you will encounter issues later on; however, if you capture the final frame, your video edit will turn out absolutely perfect. Now, let’s move on to the subsequent steps. You need to create an image, then convert it into a video, and finally, perform the necessary editing. I will explain all three of these processes in detail below.
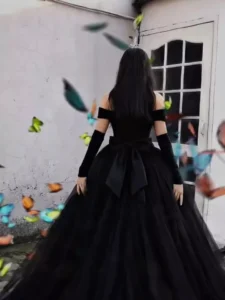
Image Prompts-
Use the uploaded black princess ball gown dress as the clothing reference.Replace the clothing of the person in the uploaded photo with the same elegant black royal princess gown.Keep the same person, same face, same body shape, same pose and same hairstyle exactly as the original photo.The dress should be a large royal ball gown with a wide flowing skirt, detailed fabric texture, soft folds and cinematic elegance.Make the clothing fit naturally to the body with realistic fabric physics.Keep the background unchanged. Ultra realistic photography style, natural lighting, cinematic look, sharp focus, high detail, 8K quality
Video Prompts –
Ultra-realistic cinematic shot of a beautiful princess wearing a long elegant black royal gown, seen from behind. The princess slowly begins walking forward in a graceful slow-motion movement. Her long black hair gently sways with the motion while the large flowing gown softly moves and drags across the ground with natural fabric physics.The princess walks like a royal queen with calm, elegant posture. Her arms move slightly and naturally while walking. The long black dress fabric waves subtly with each step, creating soft cinematic motion. The ribbon bow on the back of the dress moves slightly with the breeze.Environment: Outdoor courtyard with soft daylight, white wall and vintage door behind her. Natural lighting with soft shadows.Camera: Cinematic rear tracking shot following the princess from behind. Slow camera movement. Shallow depth of field.Motion: Natural human walking motion, slow motion elegance, realistic dress physics, hair moving gently with air. Style: Ultra-realistic cinematic look, smooth slow motion, high detail, 4K HDR, vertical 9:16, natural movement, no text, no watermark.
How To Create Ai Image
To create the image, I have already provided the necessary prompt for you. Simply copy it from the article; further down, you will find a “Create Image” option containing a link to Google Gemini. Clicking on this link will take you directly to the website. Once there, paste the prompt, then click the “+” icon to upload the screenshot you captured from the video. After that, initiate the generation process and wait just a few seconds; the tool will produce a truly professional, princess-style image for you—at which point, you can go ahead and save it.
How To Generate Video
Now, to create the video using the image you previously saved, you must first copy the video prompt. Next, you will find a “Create Video” button located below; click on it to be redirected directly to the Grok website. This is a platform where you can create videos completely free of charge. Once there, select the “Create Video” option, navigate to the “Media” section, and upload the specific photo that was generated by Gemini. After uploading that photo, paste the prompt into the designated field and click “Generate.” Simply wait a few seconds, and your video will be ready. You can then save it directly from the site.
How to Finalize Your Video Edit
Now, for the final editing stage, you need to add the video here—using any video editing application of your choice. First, add the original video from which you took the screenshot; then, add the video you just generated. Check to ensure that the two clips do not appear disjointed or mismatched. If they do seem disconnected, insert a smooth transition between them that blends seamlessly with the overall style of your video. However, if the sequence flows smoothly without the need for a transition, that works just as well—though many users might still encounter difficulties when attempting to capture the necessary screenshots.